Showing posts with label Nail art. Show all posts

Friday, December 21, 2012

Spartan Nails

 This is my favorite time of year: Fall, College Football, and Fancy Nails. I'm hoping to keep up my weekly show of Spartan pride this year and I will be collecting those looks here. EDIT: Due to a ridiculous amount of weddings on game days, I didn't get a creative design in each week, but here are the weeks I did manage to find time and inspiration.

 WEEK 11 - SPARTAN INTERLOCKING DOTS


Green: Essie - Mojito Madness
White: Sinful Colors - Snow Me White

How To: This pin should help visually, because my explanations are a bit rough sometimes. I painted my nails all white and then added a diagonal green tip. I started with the green dots (made with a medium tip dotting tool) on the white side of the line, spaced a dot's width apart. Then on the green side I added white dots sort of in between the green dots (check out steps 5 and 6 in the pin above). Then I filled in all the green and white dots, keeping in line with the first set I had made. Yeah, that made no sense.


WEEK 7 - SPARTAN CLOUDS


Green: Essie - Mojito Madness
White: Sinful Colors - Snow Me White
Black: China Glaze - Liquid Leather

How To: This is where I got the idea for the design, her tutorial is probably better, but it didn't quite work as well as I wanted. This is what I actually ended up doing. I started with all regularly painted green nails. I had a hard time getting the tops of my clouds to be the perfect OCD round I was looking for. I tried using a dotting tool, but that was too small, so I ended up using the end of a pen (totally normal). Using my very official "dotting tool" I made 3-4 white dots and using the brush I painted a white stripe from just the lowest dot. I repeated the process with the black, and filled in the rest of the tip using the regular brush.


 WEEK 5 - SPARTAN FRENCH


White: Sally Hansen - White On
Green: A ridiculous combo of green polish and glitter (just buy a green glitter striper, I found one after this at Sally's Beauty)
Pink: Essie - Vanity Fairest

How To: Pretty standard french tip process. I painted all my nails the base pink color and free handed the white tip. The best part of adding glitter is that you can cover up any imperfections in the white. Now, I do not recommend using a paintbrush and a sketchy glitter concoction, like I did. Go get a green glitter striper and make it easy on yourself.


WEEK 4 - SPARTAN ARGYLE


Green: Sally Hansen - Going Green
White - Sally Hansen - White On
Black: China Glaze - Liquid Leather
Silver striper

How To: Start off by painting half your nail green and half white, I alternated each nail as to which color was on the tip/base. I tried to be somewhat neat, but I didn't go crazy making sure my lines were perfect, because I essentially covered up the area they meet. (Sidenote: this green polish will make this white polish turn yellow if they overlap, I don't which one is more to blame, so I've tried to start using other polishes if I know the white is going on top of the green.) Now I waited forever for that to dry, I may have actually done this the night before and finished in the am. Next, I cut a piece of tape in half so I had square corners and placed the tape corner to corner meeting where my two polish colors met. Then I just painted the non-tape covered areas with the black polish and removed the tape immediately. And to finish I took a silver striper and added the criss-crossing lines. I always started with the "V" at the base of my nail and made sure that all the lines crossed each other. Just watch her video it makes more sense then my rambling. I get a lot of my ideas from her and then I just make it Spartanified.


WEEK 2 - SPARTAN CHEVRONS


Green: Essie - Mojito Madness
White: Sally Hansen - White On
Black: China Glaze - Liquid Leather

How To: This is actually a lot easier than it looks, but be warned it's somewhat time consuming. First, get some regular Scotch tape and paint a large section 2 coats of white and another large section 2 coats of black. Then while those are drying, apply to your nails 2 coats of green and seche vite top coat. I would suggest a very long dry time (as in go get a coffee and pick up your dry cleaning) before moving on to part two. Now that everything is super dry you can get on to the fun part. Using a pair of craft scissors cut varying widths of white and black zig-zags. I cut and placed the strips individually so I could work on one pattern at a time. I placed each strip with a tweezer for better control and then with a cuticle clipper I trimmed off any excess pieces. And finally, apply a thick top coat to meld the whole thing together.


WEEK 1 - NEON POLKA DOTS


Green: China Glaze - Kiwi Cool-ada
White: Sinful Colors - Snow Me White
Black: China Glaze - Liquid Leather

How To: This one is pretty simple. As with all neons, I started with a coat of an opaque white and 2 coats of Kiwi Cool-ada. Using a medium size dotting tool, I started with one color of dots then filled in between with the opposite color.


Sunday, September 9, 2012

Procession of Purples

Here are the purple polishes that I picked over the last few months.


Purple Tips
Purple  Tips
Purple: Essie - Sexy Divide
Glitter: Color Club - Lilac Hologram
Pink: Essie - Vanity Fairest

A little twist on the basic french manicure. I started with two coats of the pink and free handed the purple tips. And just to cover up any imperfections I traced the purple glitter along the edge of the tips. 


Zoya - Yasmeen
Yasmeen - The picture above isn't quite accurate, as with most of my purples this photo is coming off just a bit too blue. Yasmeen has a red toned shimmer that unfortunately isn't showing up. This reminds me a lot of Sexy Divide (my #1 purple), but SD is definitely a darker, more blue toned purple. Yasmeen is definitely moving up the list of favorite purples. 


Essie - Lilacism

Lilacism - I think I'm still on the fence about this polish. Like above, this picture is making the polish come off too blue. Lilacism is a dusty cream light purple. I'm not in love with this because it doesn't seem very special. I'm definitely a convert and love cream finish polishes, but because this one is kind of dirty looking the fact that there is no shimmer or sheen makes it forgettable.


Monday, September 3, 2012

Parade of Pinks

I want to preface the next few posts with a few FYI items. When I was only working in the office I felt like I could do some crazy things because I wasn't going to see any clients and no one else really cares, but now I'm back out on jobs so I have to tone it down a bit. As a result, I unintentionally picked only pink and purple polishes for the last two months (and one green that is going to show up randomly in a future post). Also, you may notice that as my work stress level increases there is an inverse effect on the length of my nails, so sorry about the that. 


Orly - Fancy Fuchsia

Fancy Fuchsia - This color makes me super happy!!!! It may be the best Barbie pink I think I may ever find. FF is very bright and it borders on neon. The best part of this polish is that is has way better coverage than any of the CG neons that I own. As a reference, this has a cream finish and the shade is right in between CG Shocking Pink and CG Purple Panic.


Layla - Coral Glam

Coral Glam - oooooooooo soooo pretttyyyy. This is another one of the Layla holo polishes I picked up at Ulta a while ago. Ulta was out of Retro Pink by the time I went to get more, so I had to settle for Coral Glam. While it's more peach than I would prefer, all of these holos have a gorgeous rainbow effect, so I imagine I'm going to love all of them. I did end up using Gelous as a top coat, which did make the mani last a bit longer, but not much.


Essie - Plumberry, Fergie by W&W - Hollywood Walk of Fame

Plumberry w/ Hollywood Walk of Fame - I wore this polish just recently and it is a great color to transition into Fall. At first this reminded me of Essie Watermelon, until I swatched them next to each other. Plumberry, while also leaning more red than pink, has a lot more bluish/berry tones. Fergie partnered with Wet n Wild on this small collection, but I just picked up this one polish. This has Star confetti (gold, silver, teal, coral, and lilac) with small silver bar and round glitters. The glitter did not go on evenly, I suggest just placing the color stars that you would like around your nail.


OPI - You Callin' Me a Lyre?

You Callin' Me a Lyre? - This is the pink from the OPI NYC Ballet collection. Like the white that I had previously worn, it is very sheer, but has that nice one color french mani effect. I'm glad that I went with the pink in a full size over the white, because the pink is a much more flattering than the slightly dirty looking white.


Sinful Colors - Glass Pink

Glass Pink - So I didn't even take a picture of this polish because I just kind of threw it on when I couldn't decide on anything else. It was very sheer, pale, had a bit of silver shimmer, and wasn't anything special. It gave sort of the same effect as the OPI, but not quite as good.


Sunday, August 19, 2012

OLYMPIC NAILS!!!


 Here's how I decided to show my Olympic spirit throughout the Games.

Olympic Medals


The Polish:   
  • Gold: Studio M - Gold Glitter
  • Silver: Sinful Colors - Queen of Beauty
  • Bronze: OPI - Warm & Fozzie
  • Red: Art Club Striper -  Red on Red
  • White: Sally Hansen - White On
  • Blue: Art Club Striper - Electric Universe

The Process:
Medals - Paint a nail gold, silver, and bronze, duh. Although to make it a little easier and to avoid a really thick layer of glitter polish, I would suggest using a similar color of an opaque metallic first then layer the glitter over it. 

U.S. Flag - First, I painted the whole nail white. Next, I used the blue striper to create a square in the corner of my nail. I then followed up with a red striper on the rest of the nail. To finish, I used a very small dotting tool to create the white "stars."

Union Jack - First, I painted the whole nail white. Using the red striper I created the cross in the center of the nail. Then, I added the diagonal red stripes. Finally, using a blue striper I added little blue triangles next to each red stripe. To be honest if I ever do this again I would go about the process completely differently. I would paint the whole nail blue, paint a large white cross and white diagonal stripes, and then add the red stripes in the center of all the white. I think that would make the design a bit cleaner overall. 


Olympic Rings

The Polish:   
  • White: Sally Hansen - White On
  • Yellow: China Glaze - Sunshine Pop
  • Blue: Sally Hansen - Pacific Blue
  • Black: China Glaze - Liquid Leather
  • Red: Sinful Colors - Ruby Ruby
  • Green: Essie - Mojito Madness  

The Process:  Let me just start by saying I don't think I will do anything like this again. I know it seems fairly similar to a half moon mani, but somehow it was a complete mess and I mostly blame it on that crappy yellow that I don't like that much aslfjl;asjdfiofoajsdohfoej. Rant over. I started by painting each nail the color of an Olympic ring and let it dry. Then, like the half moon mani, I placed those hole reinforcement stickers around my nail where I wanted the color to show through. Next, I painted over the whole nail with a white polish. This is where it got really messy. I'm not sure if it was because my white polish was getting old so it was goopy or if I was trying to go too fast and the layers weren't dry enough, but regardless white got everywhere. The other big problem was that the yellow reacted with the white so that it wasn't white anymore. I ended up adding a layer of top coat and then layered more white; if you're keeping track there are about 10 layers of polish on my thumb at this point (strengthener, base, 2 color, 2 white, top coat, 2 white, top coat). 
Butter London - The Black Knight
The Black Knight - Ok it's not exactly Olympics-y but I thought the fact that it was a Butter London polish made it fit with the theme. And besides aren't those red, white, and blue glitters..... well no, they're actually pink, blue, and gold, but still pretty. I honestly couldn't get a picture to really show how much the glitter shimmers. The glitter looks kind of grainy in the pic, but in really life it's all sparkle. From my previous experience with Butter London, I thought I would be proactive and just start with an opaque black and then add the glitter over top. I did two coats of CG - Liquid Leather and one coat of The Black Knight and it worked great.

Sunday, July 8, 2012

NOTW - Audrey Gets Inspired by the Internet

These are a few nail art designs that I found all over the internets (blogs, YouTube, Pinterest) and decided to try for myself. Here are the results:


Effie Trinket Reaping Nails

The Polish: 
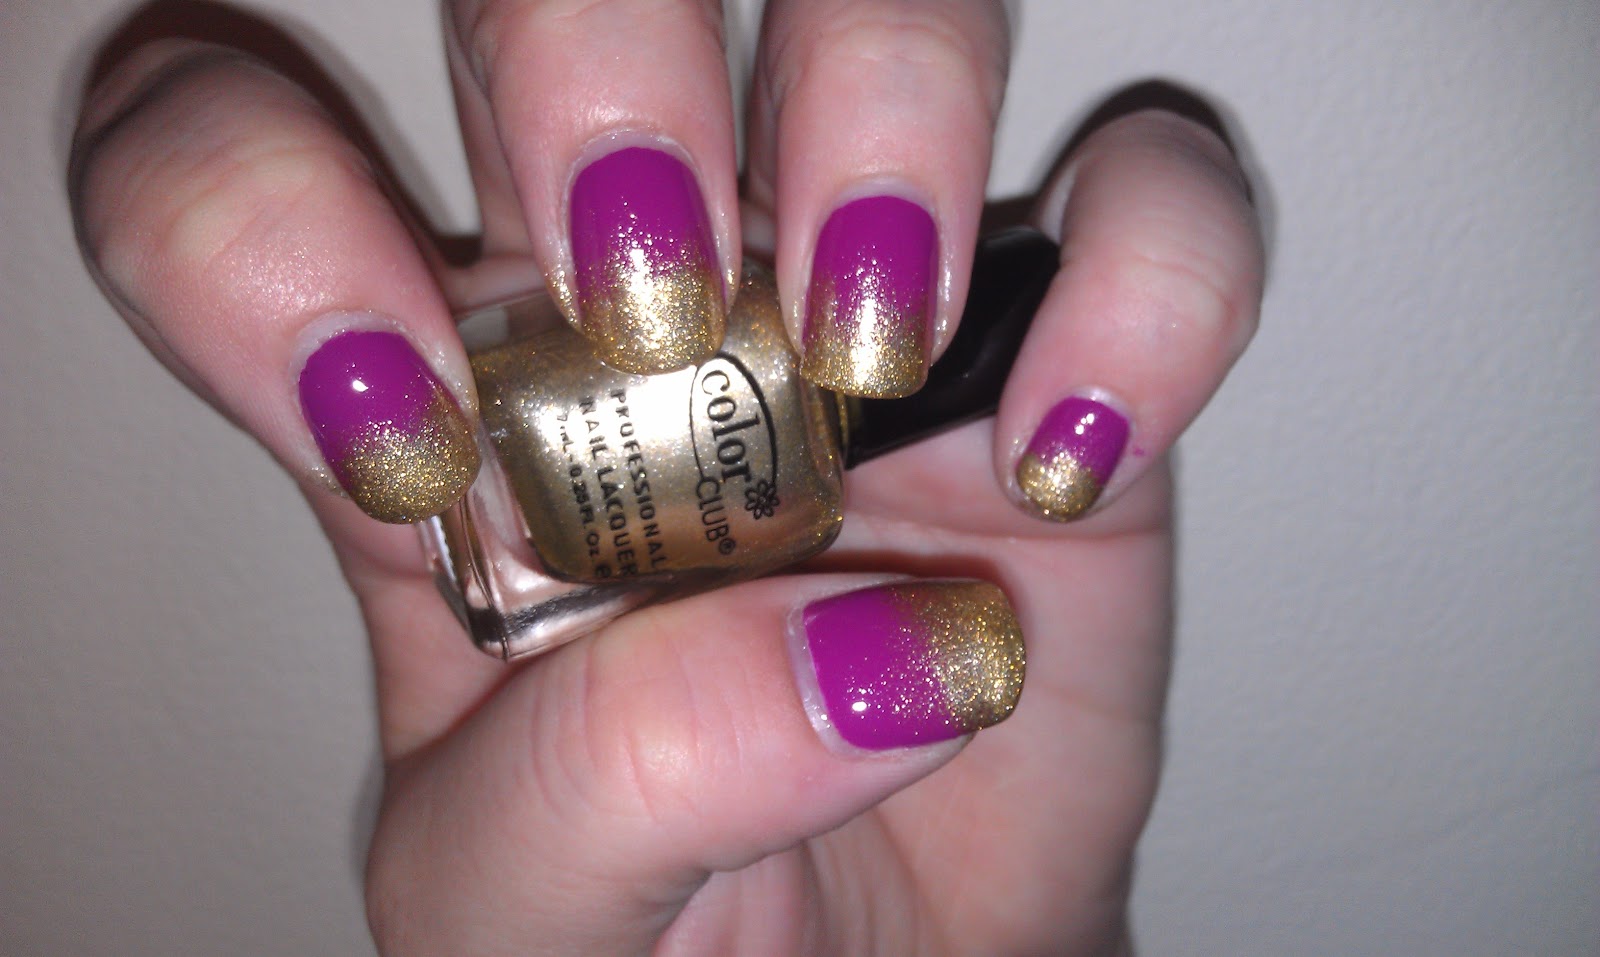
     Purple: Zoya - Reagan
     Gold: Color Club - Disco Nap
 
The Process: I started with my few day old Reagan mani and decided to extend it with gold tips. I painted the gold polish onto the end of a cosmetic sponge and began dabbing it on the tip of my nail. I focused on the tip first to get the gold opaque and then moved gradually up the nail. When there was just a little gold left on the sponge I dabbed it all over the nail to get very subtle gold gradient.

The Inspiration: To be fair there are a bunch of YouTube tutorials out there and plenty of versions on Pinterest, but here are the first two that I saw: julieg713, cutepolish


White On Black Half Moon Mani

The Polish: 
      Black: China Glaze - Liquid Leather
      White: Sally Hansen - White On
      Glitter: Kiss Nail Art Paint - Silver Glitter

The Process: This is actually one of the simplest nail art designs to work with and it's so easy to change it up and play with different colors/combos. First, I painted all my nails black (I suggest using an opaque-in-one-coat polish so there is less drying time). After the base polish is dry, I placed one of those hole reinforcement stickers, cut in half, on each nail covering as much of the black that I want to be exposed at the end of the mani. I then painted the tips of each nail white and let that color dry almost completely before removing the stickers. The nice thing about adding the glitter is that if there are any imperfections after pulling up the stickers, the glitter will cover it.

The Inspiration: I got this idea from a pin I found during one of my first browsing sessions through Pinterest, and here is the link to the actual blog post from Let them have Polish!


AMERICA!!!!!!!

The Polish:
     Red: Sinful Colors - Ruby Ruby
     White: Sally Hansen - White On
     Blue: Sally Hansen - Pacific Blue
     Glitter: Essie - Set in Stones 
     Stars: Michaels Confetti Stars (I actually only found white stars in the "It's a Girl" confetti pack so I got 
        those, but I also bought a pack of multi-color stars)

The Process: My version of this began by painting by thumb and index finger blue and then painting the rest white. I waited for my nails to be fairly dry before I started the actual nail art process. I had some blank sticker labels laying around, so I cut those into strips and placed a couple on my pinkie and middle finger. I painted the entire nail red, after it dried I pulled off the strips to uncover the white underneath. Just to add a little sparkle, I topped my ring finger with some glitter (basically one coat, with a couple glitters strategically placed). On to the stars, I put a dab of clear polish where I wanted the stars and placed them around the nail. To be honest I would do this differently if was ever going to put stars on my nails again. I needed to push the stars into the blue polish more and they needed to be shaped a little so they actually fit the curve of my nail and didn't stick out and scratch the bejezzus out of everything.

The Inspiration: This design comes from MissJenFABULOUS, you can find her info on this design on YouTube, her Blog, or Pinterest.


Thursday, July 5, 2012

NOTW - Weekend Nails 2

Continuing to be ridiculous on the weekend.

Kitty, Kitty 


As you might have guessed based on some previous nail art attempts, I did not paint these nails myself. This wasn't the first set of Sally Hansen Salon Effects Nail Polish Strips that I had purchased, but these were the first that I have actually used. I wanted something fancy, but I didn't have a lot of time to experiment and wait for my nails to dry, so these really fit the bill. They weren't too difficult to put on and there was no drying time (although I did put on a top coat, just to extend the mani). The only thing I didn't like was that the directions told you to stretch the strip over your nail, but I felt like it ended up shrinking and then my nail was showing around the polish. OK so there was one more thing I didn't like. You can remove these strips just using regular remover but it was a bit more difficult than that. The gold background removed easily, but the brown spots flecked all over the place and my fingers looked crazy. *Note - Kitty, Kitty really is the name of this pattern*


Sunset Over the Ocean


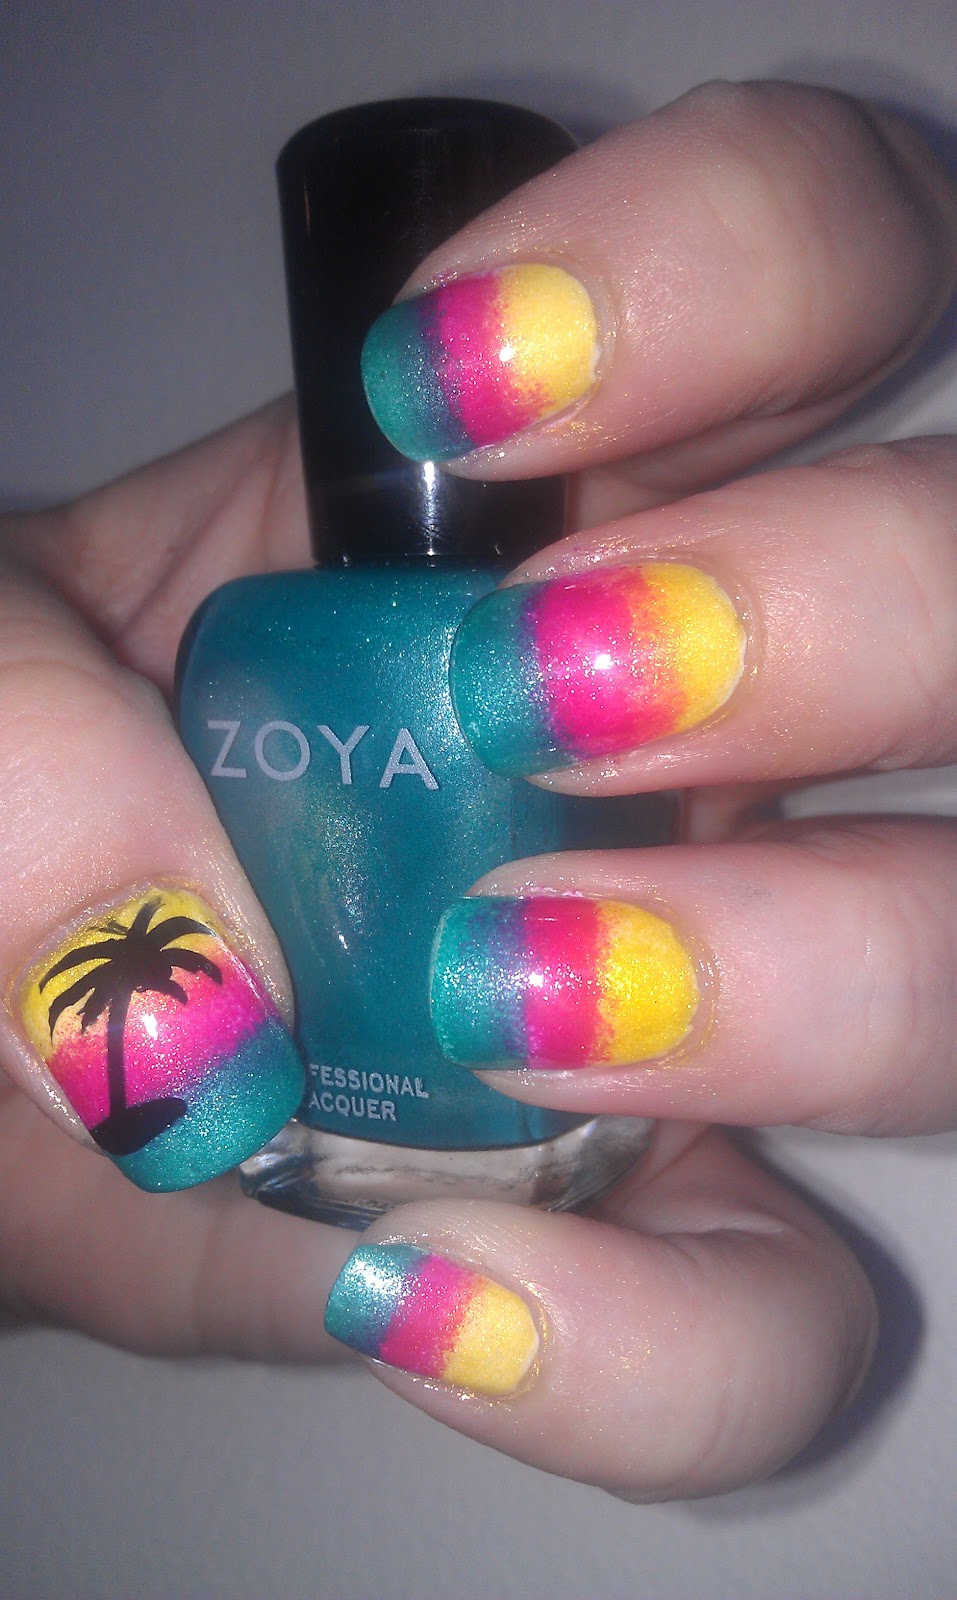
My attempt at a ocean/beach/sunset/palm tree/summer design. As I was doing this I think I was a little focused on the details and didn't see the big picture until the end; next time I would actually blend between the colors a bit more so there is actually a more obvious gradient, not just stripes.

The Process:
1. Started by painting by nails white (Sally Hansen - White On).

2. I used triangle cosmetic sponges to apply the rest of the polishes. I cut each one in half (the long way, if that makes sense), so that each large end is about the size of one nail. For my thumb I used an uncut sponge.

3. I started the actual sponging by painting a yellow stripe (Sally Hansen HD - Lite) at one end of the sponge and dabbed it at the base of the nail.

4. Followed the yellow with a pink stripe (Zoya - Kimber) on the sponge, even allowing them to overlap a bit. As I was dabbing the sponge on my nail, I lined the pink up just below the yellow. Like I mentioned before I would actually blend them into each other more by over lapping the pink over yellow and yellow over pink, to make a nice sunset orange.

5. Finally I repeated the previous step with the aqua color (Zoya - Zuza). The only difference was that after I lined up the sponge and layered the pink and aqua, I painted aqua on the edge of the sponge and dabbed some more polish on just the tip so I could get the color as opaque as I wanted.

6. Using a black striper I painted a palm tree on each of my thumbs. There wasn't a whole lot of technique here. I started with a little black mound, painted a curved line for the trunk, at the top of the tree I made an uneven circle for the palm fronds to come out of, finally each side of the tree got about four fronds of varying lengths.


Friday, June 22, 2012

NOTW - Awesome Weekend Nails

I LOVE THE WEEKEND BECAUSE I DO CRAZY THINGS WITH MY NAILS THAT SOME PEOPLE THINK ARE TACKY BUT I GET THE MOST COMPLIMENTS ON FROM STRANGERS!!!!!

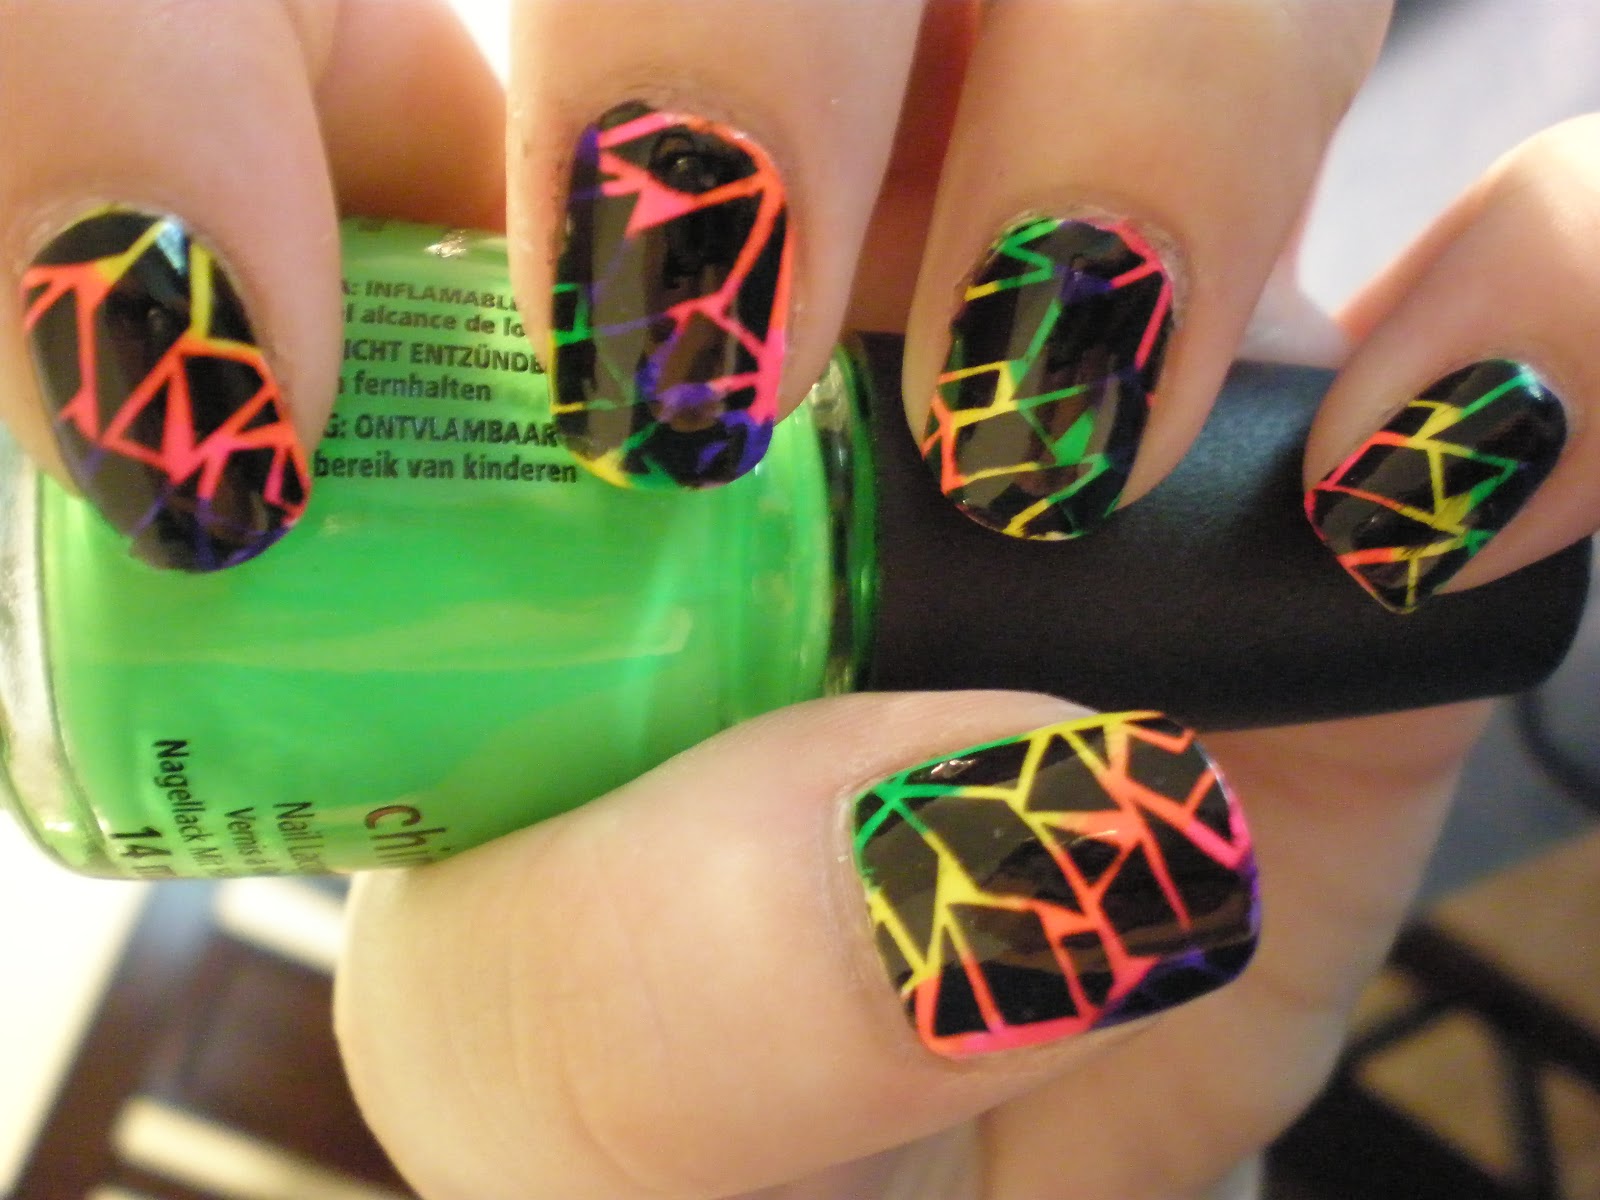
Neon Explosion


Awesome Town


The Supplies

This totally reminds me of a graphic print tee or a pair of bicycle shorts I would have worn as a little kid. LOVE!

1 - Sally Hansen White On: My go to opaque white to create a base that helps the neons glow.

2 - Studio M Grape Escape: Definitely stood out more in real life and this is the first purple neon that I have found that isn't just a dark pink (much less blue than the pictures).

3 - CG Kiwi Cool-ada: Supah amazing bright green, I will probably use this for one of my Spartan manicures at the start of the football season.

4 - CG Sunshine Pop: As you might remember from a previous post, I only planned on using this color in a neon/rainbow/orgy of color mani, so I did! Recently I broke down and bought a true neon, highlighter yellow polish (it's a lot more awesome than I expected), but it really highlighted (pun intended) how dirty Sunshine Pop looks, it's more noticeable in "The Supplies" pic.

5 - CG Pool Party: Just makes me happy! Be careful using Seche Vite with this color, because it can make it look more coral than bright pink.

6 - CG Orange Knockout: You sure are.

7 - Konad Special Polish Black: Whenever I use my stamping plates, the Konad Special Polishes really do work the best. You can use a regular polish, but try to use polishes with a really thick formula.

8-  Bundle Monster Plate BM 208/ Konad Double-ended Stamper: Yay I finally used a different stamping plate. The nice thing about this plate is that it has the option I used (geometric boxes) and basically the inverse (jagged outlines). The stamper is what transfers the image from the plate to your nail.


Splatter Attack


Ok I'm not even close to a nail artist and this didn't come out quite how I envisioned, but it's the best I could do....get off my back, GEEZ! The way that I chose the colors was these were my favorite crayons to use as a kid (I guess my weekend themes were all childhood related). The only favorite crayon color that is missing is Cerulean, unfortunately I don't think I have a polish this color and also my nails aren't big enough for a 4th splatter color.

My basic technique was to paint my nails white, plop a blob of color on to a corner of my nail, use a small dotting tool to drag out the little splatter arms, and finally put a little dot at the end of each arm.

White - Sally Hansen White On:  Duh.

Pink - CG Purple Panic (corresponding crayon - Magenta)

Green - CG Turned Up Turquoise (corresponding crayon - Jungle Green)

Purple - Essie Sexy Divide: In real life this shows up as a gorgeous purple, you can barely tell what color it is from the pic. (corresponding crayon - Royal Purple)


Saturday, May 26, 2012

NOTW - Rage, Pink Forever, Blue Me Away!


Orly - Rage

Rage - (with Suzi and the Lifeguard, Jewelry Heist) Unimpressed. Rose gold is huge right now and even though I don't wear a ton of jewelry I am soooo close to giving into this trend. Well I guess technically with this polish I did give in. Basically every aspect of Rage fell short of my expectations. The rose part of rose gold was too subtle, application got more frustrating as it became progressively more goopy, the finish was streaky, and the glitter/sparkle/metallic effect was grainy. Clearly it sounds like I hate it, but now that I'm looking at it I guess I'm only moderately disappointed. Here's the thing, I could look past the application issues if this was more rosey and was distinctly different than any other gold metallic polish I own, but it's not. Honestly, if you want a rose gold polish, you could probably do better with something else, and if you're looking for any gold polish option, you can definitely do better.


Sinful Colors - Pink Fovever

Pink Forever - I was contemplating doing another ombre manicure with pinks this time, but I realized I only have really pale pinks or dark pinks, and nothing seems to go together. Let me give you some background on me, when I decide to do an ombre my OCD comes out in full force; the polishes I use have to be the same tone and finish (only creams, only shimmer, etc.). ANYWAY! I realized I don't have any medium pink cream polishes, well this had to be remedied immediately. I found this polish at Target and it certainly fit the bill and as an added bonus, didn't break the budget (ahahhaha budget, nail polish, me, ahahahah). There is nothing ground breaking about this polish, but for $2 it's a great bubble gum pink cream. No complaints about application, easily opaque in two coats. It is possibly a bit runny, as it dripped off the wand part of the brush, but that may have been due to operator error.


Sally Hansen - Blue Me Away!

Blue Me Away! - Cute name, but false. The main reason I wasn't blown away is because the color was a lot darker on my nails than it looked in the bottle (the pic is actually a lot lighter than real life). The polish was very opaque so I'm wondering if you were really careful and only applied one coat, if that would keep the polish lighter like the bottle. On my accent nails are Blue Me Away! and Pacific Blue, yeah that lighter color is the same polish as the rest of the mani. I used Konad plate M57 (I think I need to expand my Konad collection, I have a whole mess of Bundle Monster plates, but the quality just does not compare) and stamped the flowers individually, alternating colors. I liked the mani because it worked with my outfit that day, but I'm not sure this color will make it into the favorites, or even likes, rotation.

Saturday, May 12, 2012

Nails Of The Weeks

I would love to be motivated to post nails of the day (NOTD), but there is no way that's gonna happen. I think I can manage to post my nails on a weekly basis.....maybe. So I started this little photo project on facebook, but by posting here everyone can share in my ridiculous nail polish obsession. So I'm catching up/picking up where I left off on FB. ENJOY!!!!!!


Sally Hansen - Coral Reef

Coral Reef - I saw a couple of people wearing this online and I was in love. It's bordering on a neon, but not quite. I want to say the color is somewhere between CG-Shocking Pink (see below) and CG-Flip Flop Fantasy. The name says it all, definitely a coral. A great spring/summer polish that is really pretty and flattering. 


Spoiled by Wet n Wild - Deeper Dive

Deeper Dive - I wasn't sure if I was going to like this as a full mani, but I did! The reason I liked it is the same reason I like CG-Ruby Pumps. Its glittery, but not chunky, as if the glitter is trapped in jelly. I think in real life this polish is a bit more green than the picture.

Essie - Play Date

Play Date - A slight variation on my purple obsession, this purple is much more pink toned than other ones I own. The color actually photographed fairly true to life, as opposed to showing up super blue (FINALLY!), but the pinkyness is less subtle in the pic. I have to admit I was in a fight with Essie for a while, but the last few polishes I've tried have begun to change my mind.

China Glaze - Turned Up Turquoise with Techno


Turned Up Turquoise - LOVE! Supposedly this is a neon, but I'm not so sure, it certainly is bright though.  I don't think I would call it a neon because it has a shimmer and isn't a matte cream like all the other neons I have. I think this is what I wanted CG-Aquadelic to be, but was pale and very muted. In some lights this looks green, but it's really pretty regardless of trending green or turquoise. On my accent nail is CG-Techno, which has really awesome giant holo glitters.

Essie - Fiji with OPI - Extravagance


Fiji - Super gorgeous pale pink. It's a better version of CG-Go Go Pink, mostly because Fiji is much more opaque. You know how in the summer wearing white makes your skin look amazing and tan, well that's how I felt my skin looked with this color, like my nails and skin were glowing. My accent nail was stamped with OPI DS-Extravagence using Konad plate M-57. This was the first time I used a non-special polish to stamp, it didn't work out great. I think it's partly because I couldn't be patient enough to wait til Fiji was dry so I could press as firmly as I needed.

OPI - Opulence

Opulence - This was another Designer Series polish I found, but I wasn't as blown away with this one. You can see there is a little bit of a scattered holo, but not tons. Maybe I just didn't see it because it's never sunny. Yay Michigan! I'm still on the fence about this color. Sometimes it's a dusty rose or nice bronze, but most of the time it's this in between meh color. 

Layla - Ultra Violet

Ultra Violet - I remember a time when I thought OPI DS and CG-Fairly Dust would be the closest I would ever get to owning a holographic polish.......AND THEN I FOUND LAYLA HOLOGRAM EFFECT POLISHES!!!!!! I am so excited to finally have some true holos of my own. I got them at Ulta, but they are kind of expensive and smaller than a usual polish so I only bought 3 (silver, black, purple).  Although if anyone wanted to get me Ocean Rush or Retro Pink for my birthday I wouldn't hate it. These polishes are really special when the light hits them, as you can see there is this awesome rainbow effect. I would suggest reading Scrangie's post about application, I followed her tips and I didn't have any problems.  This polish chips like crazy and super quickly because you're not supposed to use a base coat or top coat. Next time I use this polish I will use the Gelous top coat suggested by Scrangie, as it doesn't seem to disturb the holo effect (wish I had gone to Sally's and gotten Gelous before I tried this out for the first time).

China Glaze - Shocking Pink and Orange Knockout with Studio M - Grape Escape

Shocking Pink -  So I've gone neon crazy and I just can't help it. This is a bright 80's hot pink cream and I can't stop looking at my hands, there is just too much awesome happening. This color really seems to glow. My accent nail is CG-Orange Knockout (also a neon, think traffic cone orange) with Studio M-Grape Escape stamped using Konad plate M-57. Not sure if you can tell but I dotted some of the leopard spots with a mix of CG-Purple Panic with Shocking Pink.